Create your first Visual HaasScripts using “TradeBotContainer”
Let’s dive into creating your first bot using the TradeBotContainer and its associated ‘Easy’ commands.
Understanding TradeBotContainer and Easy Commands
- TradeBotContainer: These are crucial for utilizing the ‘Easy’ versions of Indicators, Insurances, and Safeties, which you can find in their respective categories under the commands tab.
- Easy Indicators: These are simplified versions of technical analysis commands. They auto-render the necessary input fields, perform calculations, plot data, and determine signals.
- Easy Insurances: They attach conditions to your indicator signals. For instance, OverComeFeeCosts ensures profitability post-fees, while StopLossCooldown blocks trades for a set period after a stop-loss trigger. Explore various conditions in the Easy Insurances category to enhance your trade bot’s efficiency.
- Easy Safeties: These commands protect your investment or deactivate the bot under specific scenarios, like achieving TakeProfit or triggering StopLoss.
Creating Your Bot
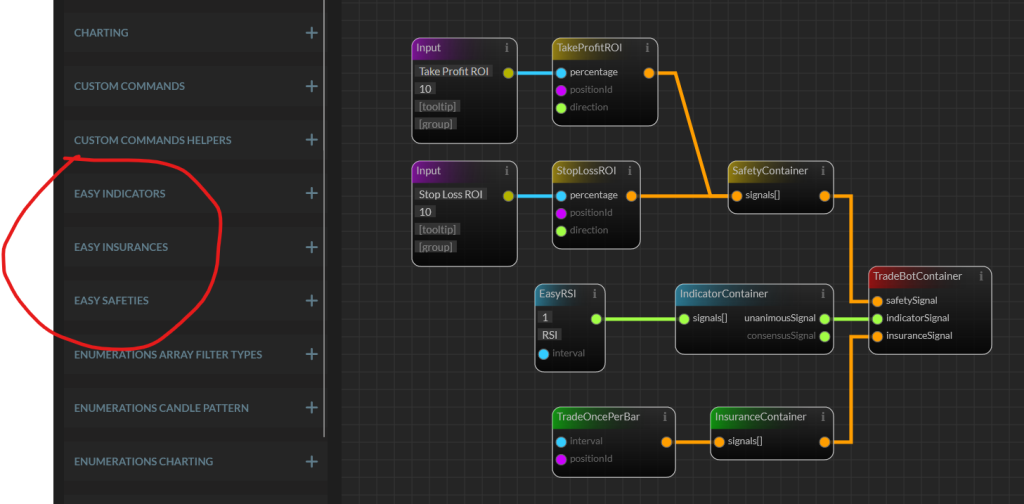
- Selecting and Linking Blocks: Choose the TradeBotContainer, Easy Indicators, Insurances, and Safeties blocks. Link them as demonstrated in the previous examples.
- Configuring Settings: After saving your script, you’ll notice input settings on the left side. For this example, select ‘Bitstamp’ under account, ‘BTC/USD’ for the market, and enter ‘1’ for the Trade Amount in BTC.
- Running the Script: Click ‘Run script’ to see your bot in action.
Understanding the Output
- Logs and Chart: The LOGS section displays backtest actions, while the CHART provides a visual representation of indicators and trading signals. You can backtest different periods by clicking ‘Backtest script’.
- Interpreting Scripts: We typically read VE scripts from left to right, considering inputs are on the left and outputs on the right.
- TradeBotContainer Mechanics: Though easy to use, it has limited functionality. Experiment with different settings values to observe changes in bot behavior.
- Configuring Safeties: In our example, the ‘Input’ (Take Profit ROI) block outputs the value ’10’ to ‘TakeProfitROI’. When ROI exceeds 10%, this block signals ‘True’ to ‘SafetyContainer’, prompting the bot to exit the position.
- Added Safeties: We’ve incorporated two safeties: taking profit when ROI is above 10% and stopping loss when ROI falls below -10%.
- EasyRSI Settings: By default, with EasyRSI, the bot will buy when the 12-period RSI is below 30 and sell when it crosses above 70.
- TradeOncePerBar Insurance: This ensures only one trade occurs per bar period, adding a layer of control.
- Experiment with Settings: Modify the values in the settings and observe how the bot’s behavior changes.
TradeBotContainer Mechanics
- Ease of Use vs. Functionality: The TradeBotContainer is user-friendly but might lack some advanced functionalities. It’s designed for straightforward use, providing a solid foundation for those new to bot creation.
Saving and Reopening Your Script
- Closing Your Script: To exit, click the ‘X’ next to ‘Hello World’.
- Reopening: To find and reopen your script, navigate to ‘Load script’, search for ‘Hello World’, and select it to continue editing.
Congratulations on creating and customizing your first bot using the Visual Editor! You’re now well on your way to exploring the vast capabilities of automated trading strategies.